

High Altitude Balloon (HAB) Flight Path Prediction Guide

Key Characteristics Required for Predictions
Before being able to estimate your HAB landing location, there are several key characteristics of your launch that must be known or estimated:
- Payload Weight
- Weight of everything not attached to the balloon
- Balloon Type
- All else being equal, a 350g balloon will burst lower than a 1000g balloon
- Our detailed Blog Post about how Balloon Type and Helium impact your burst altitude can be found here.
- Parachute Size
- Determines descent velocity profile
- Atmospheric Conditions
- The most important is the wind speed/direction at altitude
- This requires a specific date, time, and location
- Estimated Nozzle Lift
- Nozzle Lift is the total lift force of the balloon at the attachment point to the payload/parachute. Thus, it is the lift force provided by the Helium minus the weight of the balloon itself and any associated zip ties and attached fill devices that launch along with the balloon.
- A detailed overview of Nozzle Lift is provided on our website as an educational Space Camp article here.
From the above parameters, Payload Weight, Balloon Type, and Parachute Size are all known to enough accuracy for predictions. Atmospheric conditions change constantly and will strongly influence your selection of launch and landing site. Wind speed and direction at altitude can only be known for sure by launching weather balloons to measure atmospheric conditions, but there are numerous publicly available atmospheric models that predict wind conditions. Fortunately, there is a free website, Habhub, that uses all of this to give you balloon predictions for free!
The final value, Nozzle Lift, is the parameter that will determine your burst altitude as well as your rate of climb, and thus, time of flight.

Launch and Landing Site Selection
PREDICTION STEP 1:
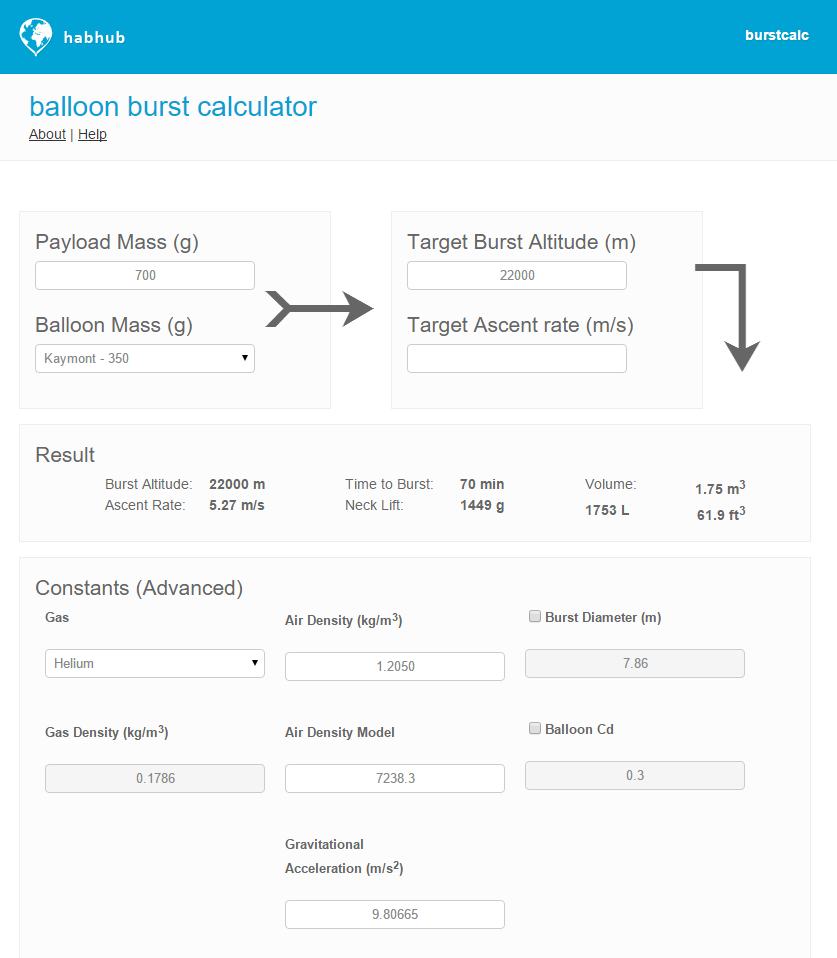
Knowing the key characteristics #1-3 above, use the Habhub Burst Estimator to determine your maximum achievable altitude, based on your balloon type and payload weight (multiply your mass in lbs. by 453.6 to get grams) - and read more about the burst calculator assumptions here. Change the altitude to trade off max altitude with climb speed (multiply meters by 3.3 to get the equivalent altitude in feet). The lower the altitude, the more volume of helium that will be required and the faster your balloon will climb; use this to shorten the distance it will travel to landing if necessary.
Fast climb rates, such as 5 m/s or greater, will result in shorter flight times, but may also result in unsteady vortex shedding behind the balloon, causing any video or pictures taken during the flight to be unsteady.
Slow climb rates, such as 3 m/s or less, will result in very high burst altitudes, but very long flight times. If you aim for a slower climb rate, make sure you test your batteries to last the length of the estimated flight.
Target around 4-4.5 m/s for an initial climb rate as a starting point.
More detail about using the burst estimator is provided in our Nozzle Lift Overview article.
Once you are happy with your configuration, write down the
- burst altitude,
- climb rate,
- and volume of helium,
as you will need these values in step 2. You will also need to make sure to get at least this much helium for launch day (standard helium tank sizes are 60 cubic feet and 125 cu. ft.).
PREDICTION STEP 2:
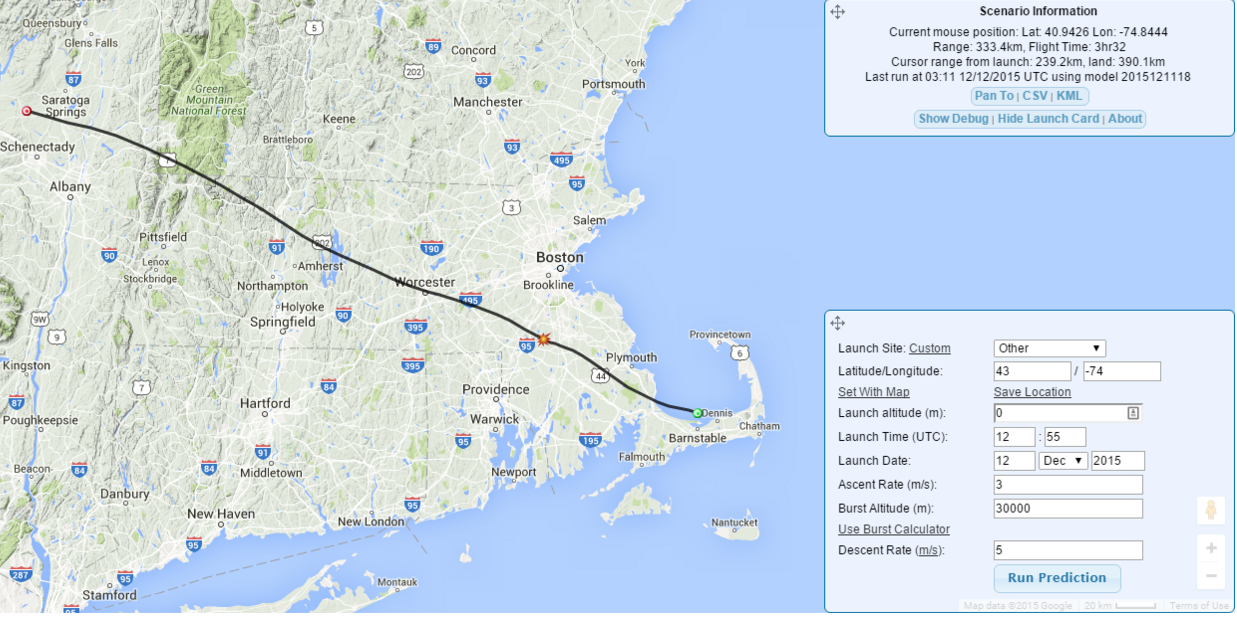
After you have your burst altitude and climb rate from Step 1, use the Habhub Predictor to estimate your flight path.
Inputs:
- Latitude/Longitude
- The easiest way to obtain latitude/longitude is to go to Google Maps. When you enter an address or drop a pin, notice the URL. The Latitude, Longitude, and Altitude appear as the numbers following the first “@” sign:
- https://www.google.com/maps/place/[address_path]/@[Latitude],[Longitude],[Altitude]z/data…
- Launch Time
- Enter your planned launch time (UTC). To convert to Coordinated Universal Time (UTC), simply use Google search by entering (for example) “convert 5PM EST to UTC”, to convert Eastern Standard Time to UTC.
- Launch Date
- Make sure to enter the correct launch date, since winds can change drastically from day to day.
- Ascent Rate
- Enter the ascent rate (in meters/sec) that you obtained in Step 1 from the Burst Predictor
- Burst Altitude
- Enter the burst altitude (in meters) that you obtained in Step 1 from the Burst Predictor
- Descent Rate (sea level)
- Keep the default of 5 m/s, as long as you are using a 24” parachute with the 1.75 lb payload with a ~6" cube Styrofoam cooler.
Hit “Run Prediction”. In the top right “Scenario Prediction” box, it allows the export of the flight path to Excel, and better yet, KML. KML files can be dragged into Google Earth to display a 3D flight path, and multiple flight paths (or comparisons) can be turned on/off:

Now, iterate the launch time/date or location until you get your desired landing location. Go back to the Burst Calculator and reduce the burst altitude to get a shorter flight distance (make sure you can get enough helium), or increase the burst altitude if you can tolerate a longer travel distance. Remember: the weather is critical and can drastically change the distance that you travel on any given day.
That’s it...you’re ready to launch!
Bounding Your Flight Path (optional)
Take it from us: no matter how much planning you do, launch day will always throw an interesting twist your way! Whether it’s a last minute change in the weather, only being able to get half the helium you needed, or deciding last minute that you really wanted to put that second GoPro on the payload and thus increase the weight, something will likely not go to plan. While you can’t completely eliminate the probability of something not going to plan, you can prepare by building some of the most common deviations from plan into your Habhub predictions.
Although the prediction you obtained is a “nominal” best-case and typical scenario, it sometimes makes sense to run additional predictions to “bound” where your balloon may land.
For example, let’s say after exhausting your helium tank that you only measure 5 lb of Nozzle Lift, when you had been expecting 7 lbs. What now?
Fortunately, this is easy enough to predict by iterating using the Habhub tools as described above. This gives you a sample landing “zone” with a best and worst case scenario, instead of just a single landing point:

Recommended parameters to look at:
- Varying the Nozzle Lift (+/- 1.0 lb of expected)
- Varying the Descent Rate (from 3.5-6.5 m/s)
- Varying the Time of Day and Date
- Varying the Burst Altitude (+/- 5,000 ft of predicted)